- [WJ-R]: 1980s object removal (Castlethorpe/Hanslope area)
- [XCS]: Pending
- [UkTrainSys]: v0.3.2.0 released
- [Object Library]: Preparing...
- [Website]: Fifth version of website launched
 My openBVE videos and other comments from users and
myself can also be found via my YouTube
channel.
My openBVE videos and other comments from users and
myself can also be found via my YouTube
channel.Blog and Progress Updates
New Video Uploaded: 3D Cabs (openBVE v1.1 Development Branch), 323 Interior, Watford Junction to Rugby Hi-Res
Posted by Anthony Bowden on 5th July 2009 at 3:50 pmopenBVE v1.1.1.0 (Development Branch), 3D cabs, and other stuff…
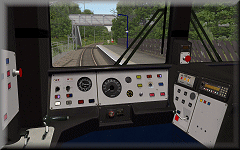 The first release (v1.1.0.0) in the development branch of openBVE was made available a few days ago, and now v1.1.1.0 has subsequently been released — the development branch includes support for full 3D cabs with animated objects, and mouse controlled camera rotation. v1.1.1.0 also introduces driver’s head motion, which responds to acceleration and deceleration, as well as inertia.
As many will no doubt have noticed, I’ve not shown much by way of screenshots or video of openBVE’s in-cab experience thus far, as personally, I’ve always viewed the existing 2D panel support as something of a legacy feature which didn’t really demonstrate openBVE’s true potential, so I’ve been waiting for this moment for a long time, and I have to say, it most certainly lives up to expectations and is quite simply fantastic! Applying emergency brakes has never been so much fun. 😉
Firstly, releases in the openBVE development branch are intended for developers who wish to expermiment with new features and offer feedback before these are eventually incorporated into the stable branch. Development releases may contain undetected issues, and features are subject to change, which means the development releases aren’t entirely suitable for regular users and the less technically minded, however I strongly recommend that developers and advanced users take a look at the development releases. If you’re interested in examining the new 3D cab support, you can head over to the » openBVE homepage « to download version 1.1.1.0, along with a demonstration 3D cab update for the 113-1000atccab train (look under Examples via the » Developing for openBVE « menu). Please also read the » Changelog « for a full list of alterations and new features.
Anyway, I’ve spent around a week working on a 3D cab for the new class 323 EMU and Cross-City South v1.4, and I’m really pleased with the results so far. I’ve uploaded a new YouTube video to briefly demonstrate the immersive nature of a 3D cab, the added realism, and some of the animated object possibilities — animated traction/brake controller, reverser and horn lever, working in-cab safety system indicators, simulated working headlights which give the effect of outside illumination (but see caveat below), along with working in-cab illumination. I think the potential of openBVE as a cab based simulator can now be truly realised, and speaking personally, this has forever changed the way I experience openBVE routes, and as long as photo-realism is maintained in new 3D cab environments, I’ll likely not want to go back to 2D cabs now.
This latest video was originally intended to show some other things I’ve been working on, so you’ll find many clips of the new 3D interior for the class 323, which includes seating, working television screens and lights, moving and streaking raindrop effects (inspired by the rain effects from Flight Unlimited 3), and ground illumination from the windows and pantograph sparking at night. The performance improvements which came with openBVE v1.0.7 also enabled me to capture some higher resolution video of Watford Junction to Rugby, of which many shots are included (and it has train sounds rather than my dreadful music this time 😉 ).
I’m also pleased to say that Cross-City South v1.4 now includes a full set of on-train conductor’s announcements, with enormous thanks to voice recording artist Pete Kingwell » http://www.petekingwell.com «. Pete has also recorded a set of alternative Birmingham New Street station announcements, and we agreed that all these sounds could be released into the public domain along with the rest of the Cross-City South v1.4 files once released. Thanks must also go to Paul Sladen (maintainer of the Ubuntu version of openBVE) for intiating this aspect of the project as well. I’m glad to be able to remove another set of copyright files from the route now, while being able to add something new which has been missing from the Cross-City South route for years as well, and an example on-train announcement is included in the video.
While viewing the 323’s cab, please note that I don’t actually know what the non-driver’s side of the cab looks like in any detail at all, so I’ve just had to use my imagination; if anyone can point out inaccuracies, feel free to tell me about them. Other than that, enjoy. 🙂
Video: Demonstration of class 323 3D cab, interior fittings, and Watford Junction to Rugby hi-res (work-in-progress) I strongly recommend viewing this video in full screen due to some night time shots, in which some details might be hard to make out otherwise. By the way, yes, I know 323 EMUs don’t run from Watford Junction — that part of the video is just a bit of fun. 🙂
» Link to YouTube page (HD – *Best Quality*) «
|
Here’s a 1280×1024 resolution screenshot of the new 3D cab. The framerate here is 25 fps, with 8x anti-aliasing and 16x anisotropic filtering enabled (on a Radeon HD 2600 Pro graphics card). Smooth transparency and anistropic filtering was also enabled in openBVE’s settings as well:
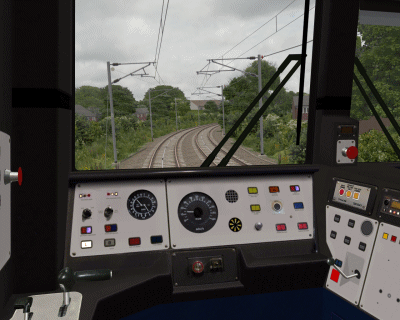 openBVE / 3D Cab / X-City South v1.4 screenshot–click to enlarge |
![]()
3D Cab Features and Animation
For the 323’s 3D cab, I’ve opted for a combination of moderately complex 3D geometry combined with photo-realistic textures, some of which were easily adapted from the existing 2D panel images. Developing the new cab wasn’t really more difficult than developing any other animated object, as that is exactly what the cab is — it just took longer as there are more animated parts. The most difficult tasks I found, were probably the gauges and needles, which needed quite a lot of experimentation before the results were right, partly because the 323’s panel is sloped backwards rather than being vertical, meaning that correctly tilting the axis around which the animated needles rotate took a little while.
As an additional starting point for other train developers, here are the functions I’m using in the panel.animated file for the speedometer, main reservoir and brake cylinder needles, amongst other features, which I’m using.
Note: Some examples include two states, where one specifies an object illuminated by in-cab lighting, and the other specifies a non-emissive version of the object, shown when the power is cut, based on state of the ats31 plugin variable defined in the 323’s panel2.cfg file (when used with Simon Gathercole’s UKMUt.dll).
The Base 3D Cab 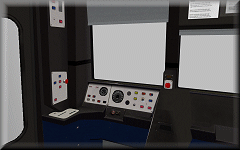 |
Base 3D Cab Objects:
[object]
states = 3dcab\class323_dmso_cab_interior_lights_on.csv, 3dcab\class323_dmso_cab_interior_lights_off.csv
statefunction = !pluginstate[31]
These two objects contain any non-animated portions of the cab, but one is a duplicate with emissive properties disabled, so in-cab lighting can be turned on and off according to the state of plugin variable ats31 in this case, which simulates the effect of the power being cut, or a cold and dark cab environment.
Speedometer and Brake Gauge 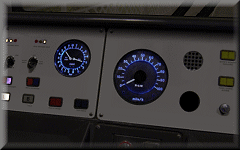 |
CreateMeshBuilder
AddVertex,-0.003,0.04,0
AddVertex,0.003,0.04,0
AddVertex,0.003,0.00,0
AddVertex,-0.003,0.00,0
AddFace,0,1,2,3
LoadTexture,speedometer_needle.bmp, speedometer_needle_n.bmp
SetTextureCoordinates,0, 0, 0
SetTextureCoordinates,1, 1, 0
SetTextureCoordinates,2, 1, 1
SetTextureCoordinates,3, 0, 1
SetDecalTransparentColor,0,0,0
SetEmissiveColor,200,200,200
RotateAll,0,1,0,90
![]()
[object]
states = 3dcab\gauges\speedometer_needle.csv, 3dcab\gauges\speedometer_needle_dark.csv
statefunction = !pluginstate[31]
position = -0.5505, 2.232, 11.452
rotatexdirection = -1, 0, 0
rotatexfunction = -3.678 + abs[speedometer] * 0.0945
rotateyfunction = -1.11
rotatezfunction = -1.57
The gauge background and cover are included as part of the base 3D geometry of the cab itself, not as seperate objects. The value -3.678 in rotatexfunction rotates the needle to 0 mph on this speedometer (adjust for your own gauge as required, using ObjectViewer to check the results). Where the last value (0.0945) is concerned, you can adjust this, initially, in 0.01 increments and test drive your train in openBVE until your speedometer is calibrated correctly (press Ctrl+V multiple times as required in-game, and compare the actual speed with the speed shown on the speedometer). Alternatively, you can temporarily replace the variable speedometer with a value in m/s (converted from the unit of measurement shown on your speedometer), check the calibration via ObjectViewer, and adjust the last value accordingly. The other rotation commands are there to tilt the axis around which the needle rotates, to match the sloped 323’s panel.
A similar approach applies to the following needles:
[object]
states = 3dcab\gauges\brake_needle.csv, 3dcab\gauges\brake_needle_dark.csv
statefunction = !pluginstate[31]
position = -0.741, 2.263, 11.462
rotatexdirection = -1, 0, 0
rotatexfunction = 1.12 + mainReservoir * 0.0000051
rotateyfunction = -1.11
rotatezfunction = -1.57
Brake Cylinder (range covers around 0-3.5 bar, as per the 2D panel)
[object]
states = 3dcab\controls\brake_needle.csv, 3dcab\controls\brake_needle_dark.csv
statefunction = !pluginstate[31]
position = -0.731, 2.263, 11.462
rotatexdirection = 1, 0, 0
rotatexfunction = -1.52 + brakeCylinder * 0.0000053
rotateyfunction = -1.11
rotatezfunction = -1.57
Combined Traction/Brake Controller 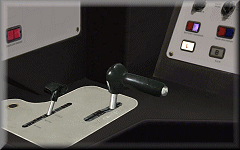 |
The reverser is pretty straightforward, however this is what I’m using for the combined power/brake handle:
[object]
states = 3dcab\controls\power_handle.csv, 3dcab\controls\power_handle_dark.csv
position = -0.952, 2.0, 11.173
statefunction = !pluginstate[31]
rotatexfunction = if[powerNotch >= 1, -0.125 * powerNotch, 0.10 * brakeNotchLinear]
rotatexdamping = 20, 0.8
rotatezfunction = if[powerNotch >= 1, 0.05, 0]
rotatezdamping = 20, 1
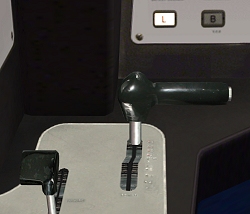 The rotatexfunction line allows both brake and power notches to be taken into account; adjust the -0.125 value to change the angle of the controller when position P1 or above is chosen, and similarly the value 0.10 for the brake steps. While determining what values to use, you can temporarily replace the above function in rotatexfunction with a simple function in the form of ROTATION_VALUE * x, where the former determines the degree of rotation, and x represents your chosen power/brake setting (for example, in the case of the class 323, a value of 1 to 4 for position P1-P4, and similarly 1 to 4 for position B1 to B3 and EMG as we’re using brakeNotchLinear here).
Also, the class 323’s combined traction/brake controller doesn’t just pivot back and forth; it’s also offset slightly to the left during the P1-P4 steps compared to the B1-B3 steps (you can see this in the screenshot on the left), which is what the rotatezfunction and rotatezdamping commands are for.
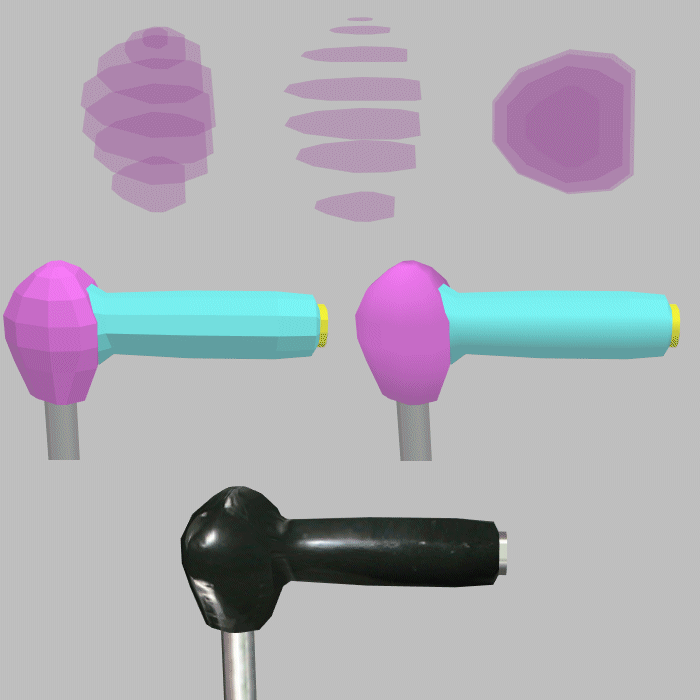
Incidentally, you might have noticed that the combined traction/brake handle appears to be a rather rounded, and smoothly sculpted object — this is achieved with a combination of 3D geometry and a good texture which captured some reflected light, further improved with custom normals (as another side note, the spherical object at the end of the horn lever shown in the next section is a pair of simple 2D surfaces arranged in a cruciform fashion; no detailed 3D geometry is needed there). How might one go about creating an object like this power/brake controller, without a 3D modelling tool? What I do, is apply the idea of the computed axial tomography medical imaging technique (CT scan) to object building; I first create a set of flat, 2D polygons or layers with temporary faces to build the basic framework of the mesh (you can draw this on paper first and number the vertices, if it helps — handy when it comes to defining faces and texture mapping later), then I adjust the vertices of the first layer until the shape looks about right, and then create the next layer and adjust and so-on, and then define final faces of the object and delete the temporary faces, followed by the addition of custom normals and texture mapping:
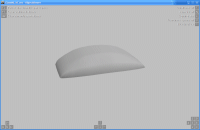
This is also the technique I used for creating the AC electric loco roof sections, by the way:
Horn Lever 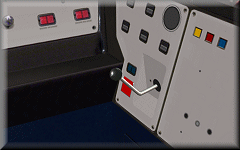 |
[object]
states = 3dcab\horn_lever.csv, 3dcab\horn_lever_dark.csv
position = -0.07, 2.06, 11.234
statefunction = !pluginstate[31]
rotatexfunction = pluginstate[24] * 0.5
rotatexdamping = 30, 0.8
rotateyfunction = -0.3
The horn lever was straightforward to implement; it’s rotation simply depends on the value of the ats24 plugin variable in this case. rotateyfunction = -0.3 simply rotates the object so it’s perpendicular to the desk panel it’s attached to.
Other indicators 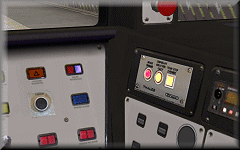 |
[object]
states = 3dcab\indicators\tpws_isol.csv
position = 0, 0, 0
statefunction = !pluginstate[10]
This is simple and works fine, and is also recommended. However, if on a state change, you notice that the newly loaded object appears momentarily untextured, and this bothers you, then you can use the following technique instead…
states = 3dcab\controls\dra.csv
position = 0, 0, 0
textureshiftyfunction = pluginstate[13] * 0.5
![]()
CreateMeshBuilder
AddVertex,-0.5905,2.0885,11.381
AddVertex,-0.5485,2.0885,11.381
AddVertex,-0.5485,2.0525,11.365
AddVertex,-0.5905,2.0525,11.365
AddFace,0,1,2,3
SetTextureCoordinates,0, 0, 0
SetTextureCoordinates,1, 1, 0
SetTextureCoordinates,2, 1, 0.5
SetTextureCoordinates,3, 0, 0.5
SetDecalTransparentColor,0,0,255
SetEmissiveColor,255,255,255
SetColor,130,130,130
SetBlendMode,Additive
Here, the illuminated DRA image is placed in the bottom half of the texture, while the top half of the image is transparent. By using a texture shifting function, no state change occurs, so you won’t notice any momentarily untextured surface appearing which can happen when a state is changed and the object hasn’t been loaded previously.
 |
If, for example, your ats subject had 4 states rather than 2 as in the above DRA example (with it’s bitmap split into 4 sections), you could use a value of 0.25 (i.e. 1 / 4) in your texture shifting function instead:
 |
Simulated Headlight Effects 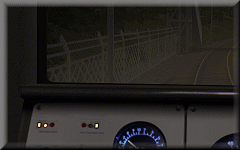 |
I’m still experimenting with the simulated in-cab headlight effects and some refinements are needed, but here’s what I’ve come up with so far:
[object]
states = 3dcab\ext_headlight_1.csv, 3dcab\ext_headlight_1a.csv, 3dcab\ext_headlight_1b.csv
position = 0, 0, 0
statefunction = if[pluginstate[20] > 0, pluginstate[20] – 1, -1]
The object code I’m using is like the following:
ext_headlight_1.csv
CreateMeshBuilder
AddVertex,-1.3, 3.0, 11.67
AddVertex,0.6, 3.0, 11.67
AddVertex,0.6, 1.5, 11.67
AddVertex,-1.3, 1.5, 11.67
AddFace,0,1,2,3
LoadTexture,transparent.png, headlight_interior.png
SetTextureCoordinates,0, 0, 0
SetTextureCoordinates,1, 1, 0
SetTextureCoordinates,2, 1, 1
SetTextureCoordinates,3, 0, 1
SetBlendMode,Additive
SetColor,150,130,100,120
The three objects are flat, vertical surfaces which load a simple texture with a sunburst gradient fill, representing a glow (similar to the light_xxxxx.png signal glow images included with openBVE’s compatibility signal objects, or the pantograph sparking effects I’ve shown previously). The glow colour in the texture is white, and the SetColor command is used to determine what colour headlight is depicted (a yellowish-white in the example above); this way, only one texture is needed. These objects are positioned just beyond the cab window, and the additive blending mode simulates the effect of illuminating whatever is behind the surface (the track and scenery, in this case). The height of the surface determines whether just the track, or the scenery, appears to be illuminated. The file “transparent.png” is a tiny, completely transparent PNG file loaded as the daytime texture, so the headlight effect is only visible in low light (as it’s loaded as a nighttime texture), or when the .Brightness command is used.
The states are linked to the proving lights in the cab (ats20), and each object has it’s surface repositioned to simulate headlights on the left or right, or centred in the case of the marker lights.
There is one caveat however; while this works well at night, or when in a tunnel during daytime, the effect doesn’t look so good when passing beneath a short overbridge (i.e. where a low .Brightness value is set over a distance of just a few metres), as the headlight glow becomes visible here, when in reality it wouldn’t. As a compromise, what I’ll probably do in the final release, is reserve the headlight effect for the nighttime headlight configuration only, not the daytime configuration (possible with the UKMUt.dll plugin). You’ll have to decide whether this minor issue is worth it or not.
![]()
Class 323 Interior
I thought I’d talk a little about the 323’s interior as well. The interior view features the expected things; i.e. seats and partitions, but I’ve also included working TV screens, working carriage lighting, raindrop effects which run down and streak across the windows at varying speeds (depending on the speed of the train), and ground illumination from the windows and sparking pantograph.
Working TV Screens 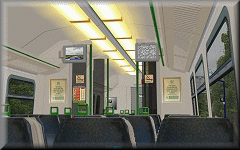 |
The working TV screens use simple texture shifting and translation functions — for the left screen with the car and rolling news ticker, there’s nothing I haven’t described before, apart from applying the functions to a very different set of meshes. Where the static effect is concerned, this is created by using two surfaces with a small texture containing a patchwork of black and white pixels; one of the objects has the texture reversed vertically and horizontally. One object is positioned slightly in front of the other, and both have alpha values set via the SetColor command to soften the appearance of the end result. These objects then have their textures shifted via the same function:
CreateMeshBuilder
AddVertex,0.46, 3.492, 3.597
AddVertex,0.765, 3.492, 3.597
AddVertex,0.765, 3.273, 3.597
AddVertex,0.46, 3.273, 3.597
AddFace,0,1,2,3
LoadTexture,Class323_TV_Texture_2.png
SetTextureCoordinates,0, 2, 0
SetTextureCoordinates,1, -0.001, 0
SetTextureCoordinates,2, -0.001, 2
SetTextureCoordinates,3, 2, 2
SetColor,0,0,0,180
SetEmissiveColor,255,255,255
![]()
AddVertex,0.46, 3.492, 3.595
AddVertex,0.765, 3.492, 3.595
AddVertex,0.765, 3.273, 3.595
AddVertex,0.46, 3.273, 3.595
AddFace,0,1,2,3
LoadTexture,Class323_TV_Texture_2.png
SetTextureCoordinates,0, 2, 0
SetTextureCoordinates,1, 2, 2
SetTextureCoordinates,2, -0.001, 2
SetTextureCoordinates,3, -0.001, 0
SetColor,0,0,0,180
SetEmissiveColor,255,255,255
![]()
[object]
states = ..\Class323_TV_2.csv, ..\Class323_TV_2a.csv
position = 0, 0, 0
statefunction = if[pluginstate[31] == 0 & pluginstate[33] == 0, -1, value == 0]
textureshiftxfunction = 2 * time
refreshrate = 0.01
The pluginstate[i] variables are there so that the TVs are only switched on when there’s power, and stay on when passing though a neutral section (ats31 is the Line Volts indicator, and ats33 the Vacuum Circuit Breaker indicator). The refreshrate = 0.01 line just adds a slight degree of flickering to the screen.
Window raindrop effects 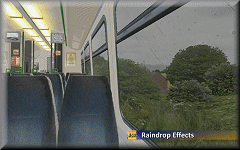 |
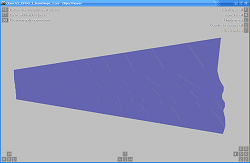
The raindrop effects also deserve a little more explanation. These are comprised of two surfaces, the first of which has ordinary raindrops similar to what you’ve seen in BVE 4 cabs, except here, the surface simply has one tiled, transparent texture containing multiple raindrops and the texture is slowly shifted. The second surface, loads a texture depicting several streaking rain drops, and the speed of the streaking is linked to the speed of the train, although they still move slowly down the window when the train is stationary. What I did differently, was to make the surface irregularly shaped, so the raindrops appear to change direction as they travel across the window due to turbulence or inteference:
 |
[Object]
position = 0, 0, 0
states = Class323_DMSO_1_RainDrops_1.csv
statefunction = !pluginstate[200]
textureshiftyfunction = -0.1 * time
textureshiftxdirection = 0, 1
textureshiftxfunction = value – delta * speed / 60
refreshrate = 0.01
ats200 is one of the raindrops you’re familiar with from the 2D BVE 4 cabs…
Pantograph spark and ground lighting effect 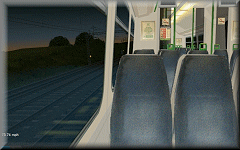 |
The pantograph sparking and ground illumination effect is a simple additively blended glow effect, which will appear mostly briefly at various times during a journey, but not continuously and not necessarily frequently. When seen for the first time, it might seem as though the effect appears at random, but actually the times at which you’ll see sparking are based on the speed of the train. This is acheived via the following function:
[Object]
states = Class323_Spark_1.csv
position = 0, 0, 0
statefunction = if[mod[speed, 3] > 2.9, value == 0, -1]
refreshrate = 0.03
Flashing Tail Light 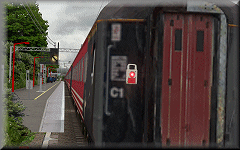 |
In terms of visual effect, the tail light is implemented just like the signal aspects. The animation code I’m using to achieve a short blink followed by a longer period of extinguishment is as follows:
[Object]
States = TailLamp_1a.csv
Position = 0, 0, 0
StateFunction = if[mod[time, 0.55] > 0.08, -1, 0]
Signal Ground Lighting 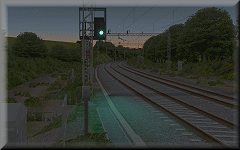 |
These effects are really easy — the objects are just like the headlight objects mentioned previously, except these extend out behind the signal and are animated objects loaded via .SigF commands instead. The simple animation function I’m now using is as follows:
[Object]
Position = 0, 0, 0
States = Sig_GroundLight_R.csv, Sig_GroundLight_Y.csv, Sig_GroundLight_Y.csv, Sig_GroundLight_G.csv
StateFunction = if[section > 0, section – 1, 0]
Incidentally, I’ve now adopted more or less the same technique developed by michelle for openBVE’s compatibility signal objects where my own signal aspect/lens and glow effects are concerned, as it’s obvious that a lot of care went into these effects, and they look superb when applied to my own signal objects with the lens hoods as well (see the video…).
![]()
Updated Pantograph Animation Functions
Lastly, I’ve updated my old Animated Exterior Car Objects blog entry to include some updated unctions which resolve a problem with the code which I hadn’t considered previously. Bascially, the code I used meant that the pantograph animation speed was dependent on the framerate on the user’s computer, which is obviously no good — if slow framerates were encountered, the animation would proceed very slowly, while if high framerates were experienced, the animation speed would be too high. By incorporating the delta variable and a factor into the functions, this problem is solved. Actually this should have occured to me, because I observed this behaviour when I was experimenting with the wheel rotation initially… D’oh. Thanks michelle !
Tags: Animated Objects, Artwork, Cross-City South, Functions, openBVE, Screenshots, Videos, Watford Jn to Rugby

Wow !, looks like you are still having a lot of fun with openBVE, and I have a feeling this is just the tip of the iceberg, I take my hat off.
This is absolutely fantastic, you really are creating some wonderful entries here! Let’s hope many more updates and routes come from you + more developers looking at your work as influence on cooking some good content for OpenBVE!
/Rich
Just stunning cant wait. And trains are not my main thing but when I see a master pice like this well im lost for words.
Wow, this is looking absolutely spectacular now. In particular, you or Michelle has now addressed the issue of the sound of passing vehicles, the lack of which dogs MSTS and Rail Simulator, where the whole train passes as one object with lousy doppler. The loco sounds a bit whiny and the coach sound lacks punch and volume, but it’s still something to hear them all scream by. Makes a big difference when you get the sound right! (I can forgive MSTS for this given its age but Rail Simulator really dropped the ball on both sound and OHLE.)
I don’t know whether it’s possible to make the rails more reflective — they should reflect the signal and headlight illumination far more than than the ballast. No idea if you have control over reflectivity of surfaces yet. See if you can. Still, the night scenes are stunningly atmospheric; I love the night and the footage really calls to me — I can barely tell it from reality. Seeing the view through the connector into the next carriage and seeing it swaying about was funny too — I always find that disturbing as you never feel as thrown about as it makes you think you are.
Also, the inside views bear one nit (aside from the visible aliasing) — the carriage sides are 2D! Looks like a cardboard cutout train 😛
As you know, my PC has craptacular video, so it’s also just great seeing the frame rates you get.
I am looking forwards to see what ground is broken with the next update.
I’m not sure about reflective rails yet (or incandescent bulb fading); I could maybe do something where reflections from signals or static lineside lights are concerned though.
For the 323 passenger area/in-car 3D models, point taken. Incidentally, there’s enough detail in the leading car to give something to look at wherever the camera is positioned, however the overall design was planned so that full 3D detail is visible from only specific sets of seats in the leading vehicle. The interior of the second car shown in the video, is actually a flat texture, and just simple seat objects are positioned in it, which are meant to be viewed from the outside only. This helps to keep framerates higher, and also let me capture higher resolution video without my computer going up in smoke. Currently, the exterior and interior 3D geometry for the cars is displayed simulataneously as they’re all part of the exterior car view, rather than being displayed via seperate camera views of course, so I need be careful with the detail. I could add 3D window surrounds to the windows near to those specific sets of seats mentioned before however, which would be an acceptable compromise without decreasing framerates much at all. With a fast computer, I know this is much less of an issue though, but I’m not sure how many people in the community have fast enough hardware for such luxuries as full details in all cars while also having good framerates. In time, good things may come though… 🙂
Wow, that really looks stunning, and I still have to watch the video yet, as it is just loading. You’re really a master of your art. And by the way, your music isn’t that dreadful, I’ve even put one track on my iPod. 😉
Thanks Jan. Which track? 😉 I hope it came from the downloadable video rather than the YouTube version, as the quality is better (and less distorted in the case of one of them).
What I should also mention is how great it is to just sit and watch the view in passenger mode. The raindrops on the window really help the atmosphere and realism too. Until now, I felt that Rail Simulator had overtaken you in terms of quality, but the finished product of the animated 323 plus the revised routes is going to be far ahead.
One last thing ….
Something you should consider with the signals is that incandescent bulbs take a short while to heat up, and even longer to cool down. As such, you should put a couple of transitions in for when the signals change. You don’t fully realise how long this lag is until you see LED signals and indicators on motor vehicles and how much faster they can switch on and off.
This is… brilliant! Spectacular! Honestly this has inspired me enough to want to make my own route!
I especially like how the tail and headlights are visible from the cab of the Class 323.
But I have one question, what are the lights/sounds at 3 minutes and 41 seconds into the video about? (When I heard it, I almost jumped)
Anyways, this looks great. Can’t wait until it’s released!
@Chicken
The lights and sounds you mention are some kind of automatic warning system for track workers.
Thanks. I’m not absolutely sure and I hope someone will correct me if I’m wrong, but I think the lights/alarms make up the Train Operated Warning System (TOWS); you might like to read this forum thread: http://www.railforums.co.uk/showthread.php?t=25664
I noticed that the door closing sound is not syncronised with the motion… maybe you should put some kind of function like
If[rightDoors>0.5,-1,-2*(rightDoors)]
?
Thanks. I’ve adapted the function for the 323, and it works quite well. I’ll need to experiment a bit further though, particularly given the door opening sound being used at the moment.
Wow, it was hard to believe in parts of the video that this is a simulator, never mind photo-real cabs, the whole thing is looking photo-real. I think MSTS and RS need to watch their backs now, they have some real competition on their hands. I for one would pay good money for this sim. Well done developers, keep up the great work.
Dave.
Thanks for the comments everyone, and sorry for the very slow response…
Is this published yet?
Only the class 323’s new 3D cab has been published so far (although there’s still some work to do on it, as it’s also intended for testing purposes). Where Cross-City South is concerned, just keep an eye out for any release announcements concerning v1.4 rather than v1.31; I’ve amended the homepage to make this distinction a bit more clear.
amazing just amazing i cant say anything else.
[…] Sim Routes 網主於2009年7月5日,在其網站的網誌,推出了一段包括有列車 3D […]
I rarely leave a response, but i did a few searching and wound up here New Video Uploaded:
3D Cabs (openBVE v1.1 Development Branch), 323 Interior, Watford
Junction to Rugby Hi-Res
does amazon aws use vmware
learn trading from scratch
You will draw more loyal readers to your site and keep
your readers coming back because you are sharing
the best with them. Typically, it’s good practice to maintain about a 5% usage for your keywords or phrases.
Whether you promote yourself as a solo or business brand (< learn 10 ways to improve your SEO with Google+) Google+ is now a necessity.
Feel free to surf to my blog – sme
System
Register
blog topic
As soon as I noticed this web site I went on reddit to share some of the
love with them.
What’s up mates, its great paragraph concerning tutoringand entirely defined, keep it up all the time.