You are here:
Home > Help & Information >
openBVE Help & Information >Ubuntu 10.10 (Page 1)
▪ openBVE Help and Information
This section of the site is designed to help you get started with the realistic
openBVE train simulator in Windows (XP, Vista, 7) and Ubuntu 10.10, as well as guide
you through the installation and first use of the
Birmingham Cross-City South route to enable you to start driving. Some parts
of this guide are geared towards novice users.
▪ Contents
Ubuntu 10.10 Users: [Click
here to select a different operating system]
Page 1:
Page 2:
Page 3:
Page 4: (Current Page)
▪ Downloading and Installing Ubuntu via Wubi
Wubi is an Ubuntu installer for Windows which is officially supported, allowing
newcomers to Ubuntu (and Linux) to easily install or remove an Ubuntu Linux installation
from within Windows (the Linux operating system itself doesn't run within Windows
however!), and boot into Ubuntu via Windows' own boot menu. If you're new to Linux,
this is a good way to introduce yourself to the operating system without having
to worry about partitioning your hard disk, accidentally wiping out your existing
Windows installation, or any other problems which could occur during a manual operating
system installation or removal process.
So if you don't have Ubuntu installed already, and want to easily use both Windows
and Linux side-by-side on your computer,
visit the
Wubi Homepage and click the large
Download Now
button.
Save the file 'wubi.exe' to a folder of your choosing; for the purposes of this
guide, I'd recommend
'<System_Drive>:\Downloads'. The following
steps assume that this is where you've chosen to save the file.
Next, follow these steps:
Using Wubi to prepare your Ubuntu Linux
installation
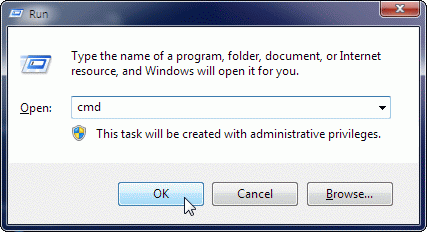
- Go to 'Start Menu > Run'
and type 'cmd', and click OK:
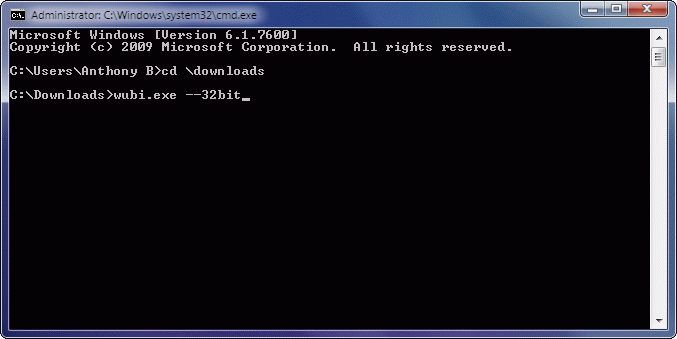
- For the next step, we'll use the Windows Command Prompt; this will prepare you for
similar tasks we'll perform in Linux later on. Enter the following commands,
hitting Return after each line:
cd \downloads
wubi.exe --32bit
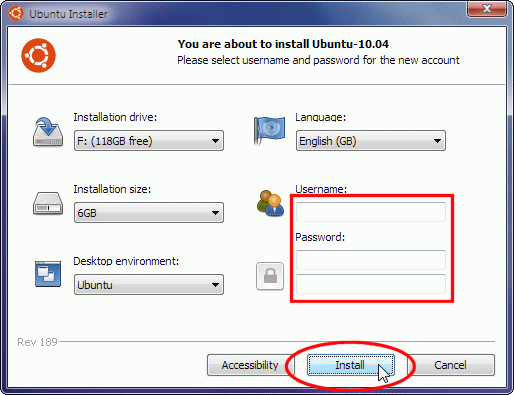
- When the Ubuntu Installer appears, leave the default options as they are
unless you have a reason to change them, enter a username
(your current Windows username will probably be chosen automatically), and enter
a password in both boxes provided. You must remember
your username and password, you'll be using these to login to your Ubuntu desktop,
and may be prompted for your password when making changes to your operating system
while in the Linux environment.
- Now let the installer download the Ubuntu ISO (disc image) to your
hard disk, which will be around 700MiB in size, let it prepare the installation,
and then reboot your computer when prompted.
Next, we'll boot up in Linux rather than Windows, and finish the installation:
Finalising your Ubuntu Linux installation
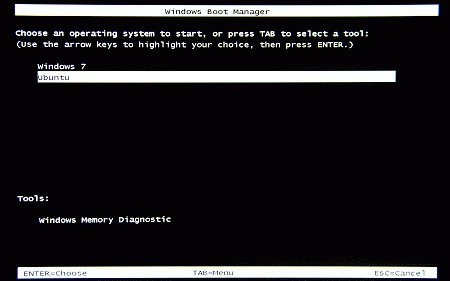
- When your computer reboots, you'll see you have a Boot Menu which
you may not have had before, if you only had a single Windows installation previously.
Before the countdown timer expires, select Ubuntu from the list,
and hit Enter.
- You'll now see some messages on screen, and the first will be:
'Press 'ESC' to enter the menu ... x'.
Don't press Escape, just let the countdown expire. Ubuntu's animated
splash screen should then appear, and an automated installation process will be
carried out. Just let this run it's course (it shouldn't take too long, possibly
just a few minutes if your system is fast enough), and when done your computer will
automatically reboot again.
- When you're presented with your new Boot Menu, select Ubuntu again, and this time
you should eventually be presented with a rather nice graphical login screen.
Enter the username and password you chose when you ran Wubi, pressing
Enter each time.
▪ Updating Ubuntu
Hopefully, if Ubuntu is compatible with your system, you'll now be presented with
the Ubunu Desktop (the GUI is called GNOME). Shortly after, you'll likely see the
Update Manager window appear, asking you to update your Ubuntu installation. You
should do so, in order to be up to date and to patch any security related problems.
This is essentially Ubuntu Linux's equivalent of the Windows Update feature. Simply
click the Install Updates button when this window appears (and
enter your password when prompted):
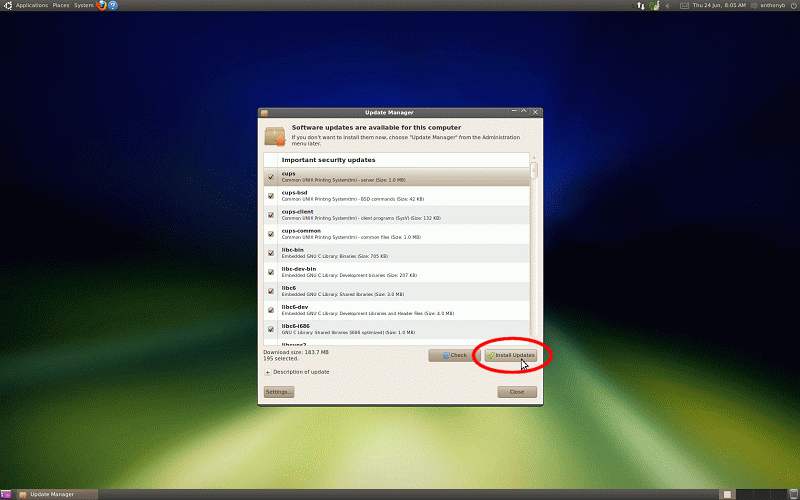
The Update Manager will finish updating your installation shortly.
▪ Preparing Graphics Drivers - ATI Users
Next, we want to
install some graphics drivers which will let you run openBVE
with higher framerates. This guide assumes you're using either an
ATI
Radeon or
NVIDIA GeForce graphics card.
ATI users can follow these steps (NVIDIA users, see further down):
Installing the ATI Catalyst Control
Centre
- Click the Firefox icon on the GNOME Main Menu Bar (the top panel):

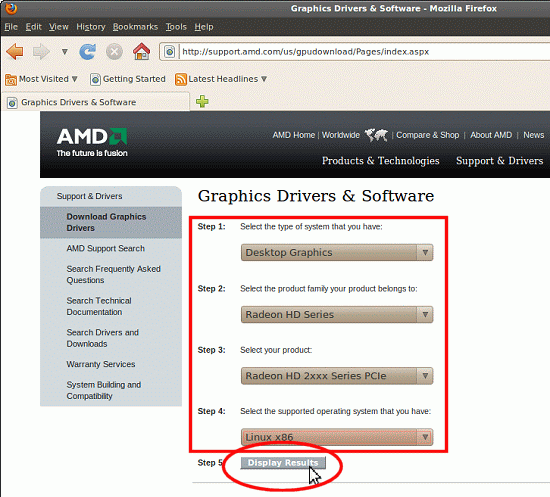
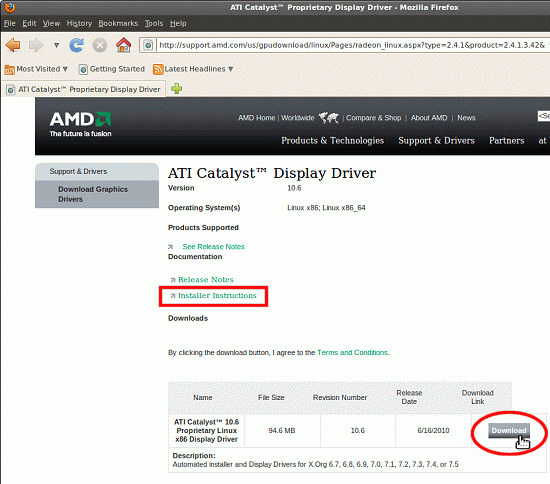
- Visit
http://support.amd.com/us/gpudownload/Pages/index.aspx and choose your
graphics card, select 'Linux x86' > 'Radeon', and click
'Display Results':
- Next, click the Download button on the resulting page, and save the
'ati-driver-installer-10-6-x86.x86_64.run' file
to your hard disk (by default, your /home/username/Downloads folder).
Also click the Installer Instructions link, which will open a PDF
document which you can read through. This openBVE help guide will give you
the necessary instructions to install the driver however:
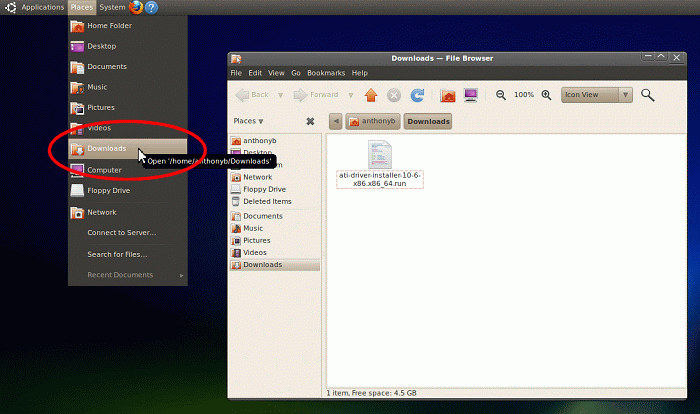
- Once the file is downloaded, it will likely be within your
'home/username/Downloads' folder. First, open
this folder, by going to 'Places > Downloads' (you should see the
driver there):
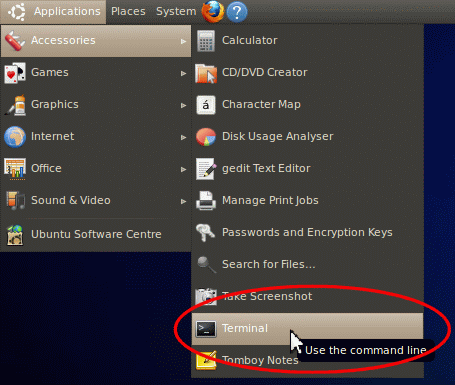
Next, we need to
run the installer, and for this, we need to use the Terminal (you
can think of it as being the equivalent of the Command Prompt in Windows). On your
Main Menu Bar, select 'Accessories' > 'Terminal':
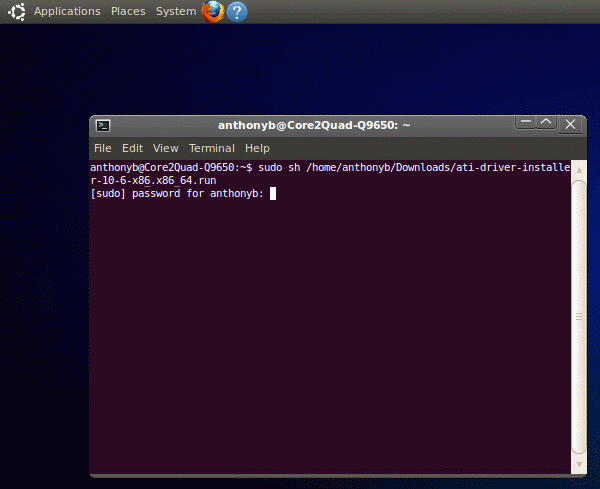
- Your desktop should now look as it does in the following screenshot.
At the terminal prompt (which will be <username>@<computername>:~$ ),
enter the following line (you can copy and paste the filename of
the driver you downloaded by right-clicking it's icon, choosing Properties from the
context menu, right-clicking the highlighted filename in the Name editbox, and
selecting Copy. Then go to the terminal window, and press Ctrl+Shift+V to paste the
filename where appropriate. Don't forget to replace <username> with your own
username! Thus:
sudo sh /home/username/Downloads/<replace_with_your_downloaded_driver_filename>
Note: In Unix based operating systems, case sensitivity matters - the
uppercase D in Downloads is important! The sudo (su "do") command
lets you execute the installer as superuser (you can think of it as being like running
an application as an Administrator in Windows), hence, you'll be prompted for your
password; type it in, and hit Enter:
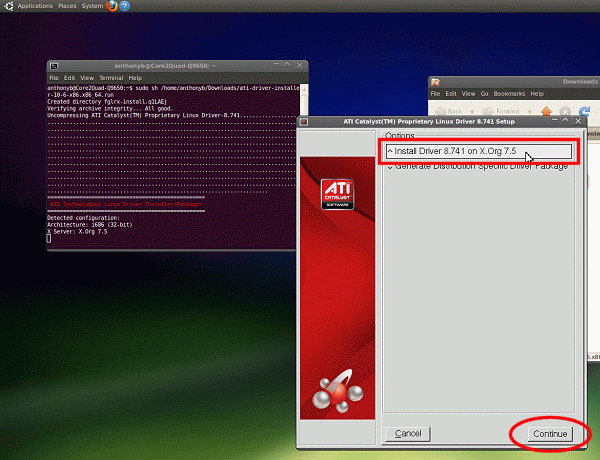
- Stuff will happen in the Terminal window, and after a few moments, the ATI Proprietary
Linux Driver Setup window will appear. Select "Install Driver x.xxx on X.Org
7.4 and later releases", and click Continue:
- Select 'Automatic', and click 'Continue':

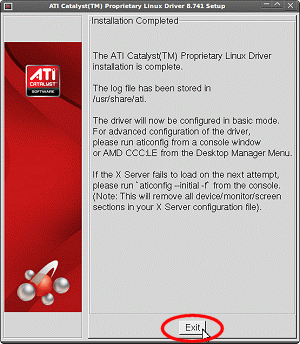
- The driver will now be automatically installed, and when done you'll see the following
message (write it down if you like). Then, just click Exit:
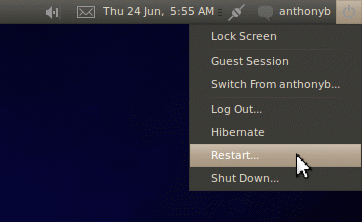
- Now, click on your username in the upper right of the screen, and restart
your computer:
The next time you start Ubuntu, hopefully you'll be successfully using your new
graphics driver.
Next, you can configure your anti-aliasing and anisotropic filtering settings:
Setting anti-aliasing and anisotropic
filtering via the ATI Catalyst Control Centre
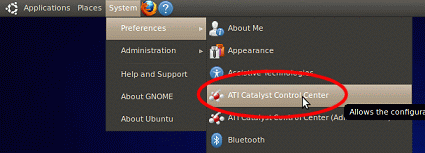
- From the GNOME Main Menu Bar, select 'ATI Catalyst Control Centre':
- If you cannot find a menu item named 'ATI Catalyst Control Center', instead,
you can open a terminal window, type the following command, and press Enter:

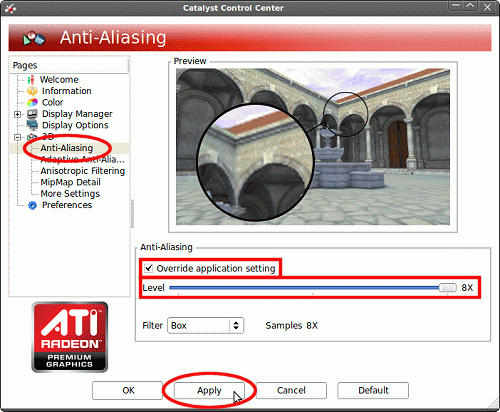
- When the Catalyst Control Centre appears, click the Anti-Aliasing entry
on the left, check 'Override application setting', and choose your
level of anti-aliasing. Click 'Apply' when done:
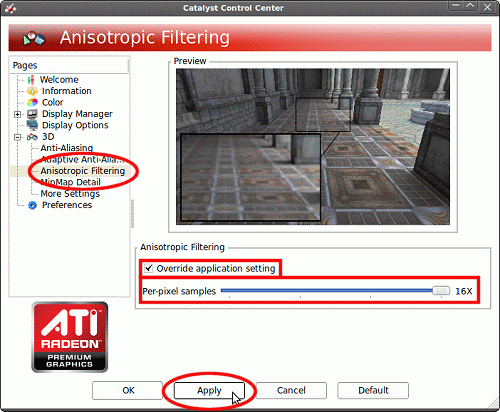
- Click the Anisotropic Filtering entry on the left, check
'Override application setting', and choose your level of anisotropic-fltering.
Click 'Apply' when done:
Now click OK, to exit the Catalyst Control Centre.
Note: The more powerful your graphics card, the higher these settings
can be without the performance penalty being too great--you may wish to experiment
with the settings once you've seen how openBVE runs with the selected levels of
anti-aliasing and anisotropic filtering. If there is any performance degradation
and you find it unacceptable, repeat the above steps and select lower levels of
anti-aliasing and anisotropic filtering, and then try openBVE again.
▪ Preparing Graphics Drivers -- NVIDIA Users
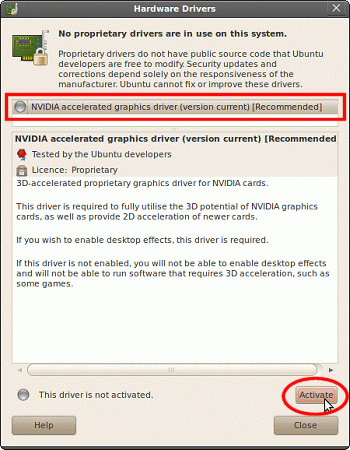
NVIDIA users can follow these steps to install the NVIDIA graphics driver:
Installing the NVIDIA graphics driver
Next, you can configure your anti-aliasing and anisotropic filtering settings:
Setting anti-aliasing and anisotropic
filtering via NVIDIA X Server Settings
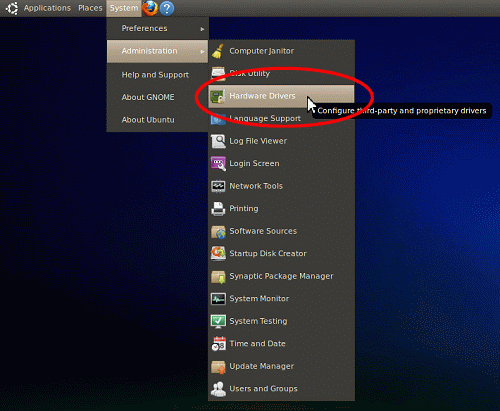
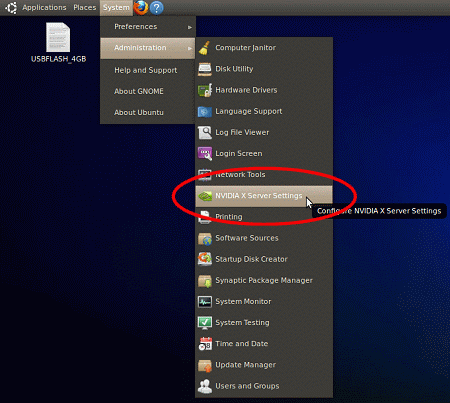
- From the GNOME Main Menu Bar, select 'System' > 'Administration' >
'NVIDIA X Server Settings':
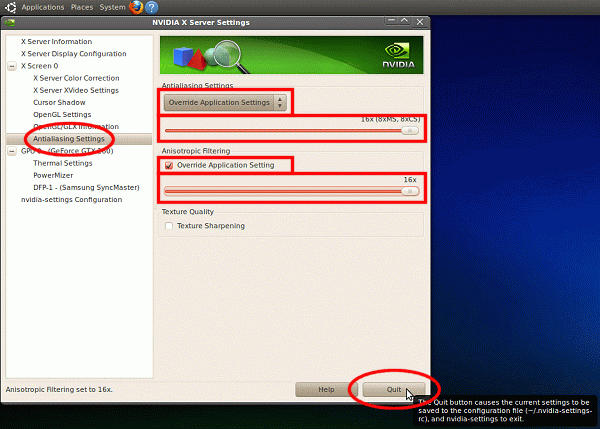
- Click the 'Anti-Aliasing Settings' entry on the left, place
a tick in both 'Override Application Setting' checkboxes, and choose your
level of anti-aliasing and anisotropic filtering. Click 'Quit'
when done:
Note: The more powerful your graphics card, the higher these settings
can be without the performance penalty being too great--you may wish to experiment
with the settings once you've seen how openBVE runs with the selected levels of
anti-aliasing and anisotropic filtering. If there is any performance degradation
and you find it unacceptable, repeat the above steps and select lower levels of
anti-aliasing and anisotropic filtering, and then try openBVE again.
Content last updated: 1st December 2010