You are here:
Home > Help & Information
> openBVE Help & Information >Windows (Page 2)
▪ openBVE Help and Information
This section of the site is designed to help you get started with the realistic
openBVE train simulator in Windows (XP, Vista, 7) and Ubuntu 10.10, as well as guide
you through the installation and first use of the
Birmingham Cross-City South route to enable you to start driving. Some parts
of this guide are geared towards novice users.
▪ Contents
Windows Users: [Click
here to select a different operating system]
Page 1:
Page 2: (Current Page)
Page 3:
▪ Installing the Birmingham Cross-City South and Class
323 EMU
You're now ready to
download the Birmingham Cross-City
South route from this site, along with the
Class
323 EMU from Trainsimcentral.
Open this link
to the Cross-City South download page in a new tab,
so you can continue reading this page in this tab.
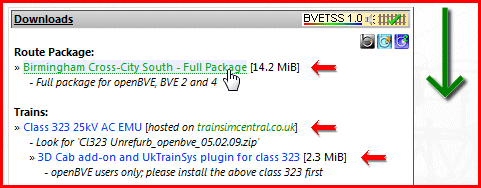
Downloading the Cross-City South route
and Class 323 EMU
- On the Cross-City South download page, scroll down, until you find the "Downloads"
box. Now you can download:
+ Birmingham Cross-City South - Full
Package (x-city_south_v1-31-xx.7z)
+ Class 323 25kV AC EMU (look for "Cl323 Unrefurb_openbve_05.02.09.zip")
+ 3D Cab add-on and UkTrainSys plugin for class 323 (323_unrefurb_3d_cab_plugin_2010-xx-xx.7z)
Next, locate the
three files you've just downloaded, and follow these steps to extract
them to your openBVE content folder:
Next, we need to install the Unrefurbished Class 323 EMU:
Lastly, we need to install the 3D cab and UkTrainSys cross-platform .NET plugin update for the Class 323 EMU:
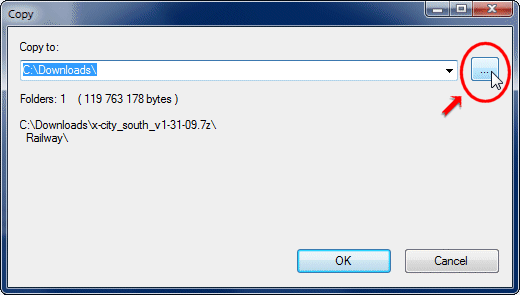
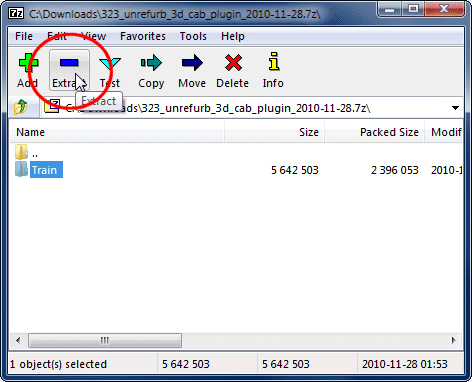
Extracting the 3D cab and UkTrainSys cross-platform .NET plugin to your openBVE content folder
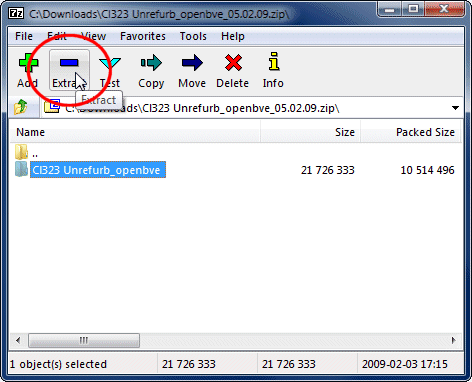
- Right-click the 323_unrefurb_3d_cab_plugin_2010-xx-xx.7z icon, open
the '7-Zip' submenu, and click 'Open archive'.
- Now, ensure that ALL the contents of the archive are selected (in
this case, the 'Train' folder), and then click the 'Extract'
button:
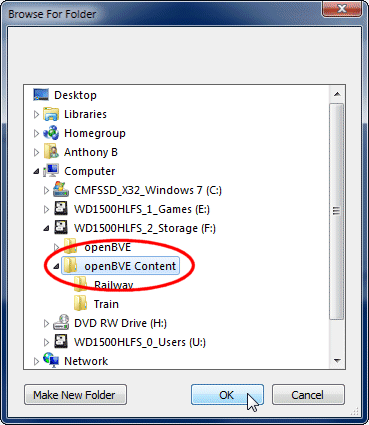
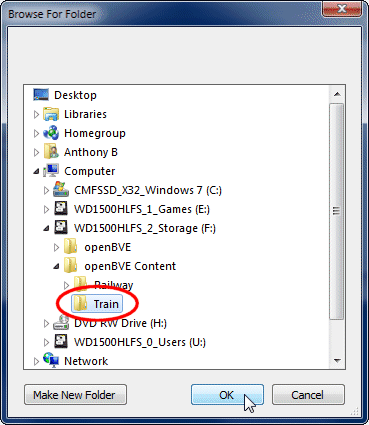
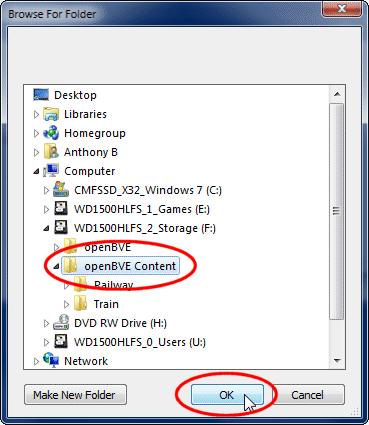
- Click the browse for folder button on the right (labelled '...').
- Locate the 'openBVE Content' folder
you created earlier, select it by clicking once, and then click 'OK':
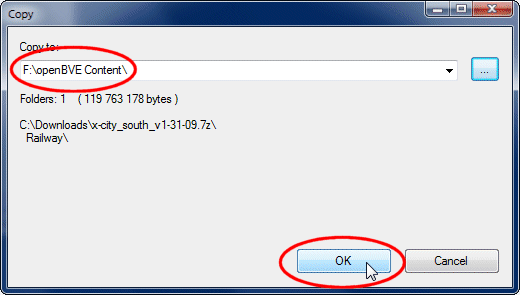
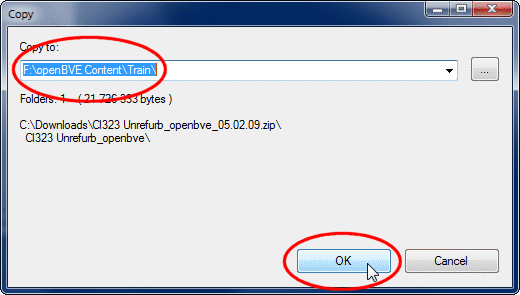
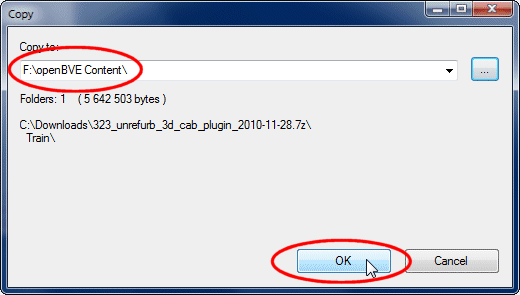
- Now verify that the correct folder is listed in the 'Copy to:' box, and click 'OK':
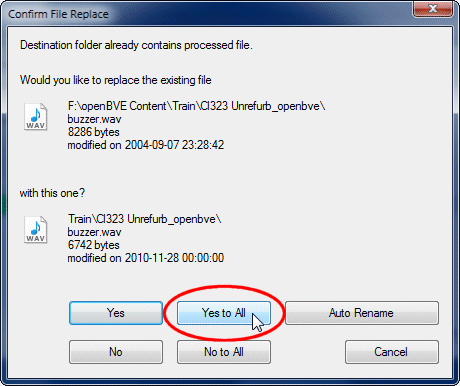
- You should be prompted to overwrite some existing files (if not, then you've either not installed the base class 323 yet, or you're extracting files to the wrong folder - in either case, please start again with the class 323 installation steps, and follow them in the correct order).
You should click the 'Yes to All' button:
And finally...
Verifying your installation
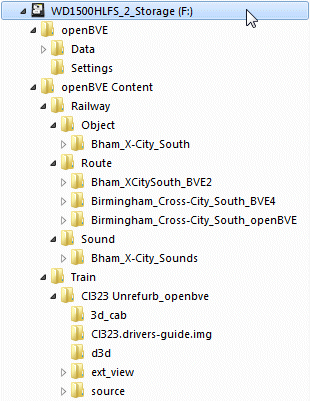
- Once you're done, and after returning to Windows Explorer, if you installed everything
correctly, your folder structure should now look as it does in the following screenshot:
If your folder structure does not exactly match what is shown above (apart from the drive letter and folder in which your 'openBVE' and 'openBVE Content' folders are located), then you have likely done something wrong - please start over and follow the instructions again.
▪ Starting openBVE
You're now
ready to launch the program. Double click the desktop
shortcut you created earlier, and you'll be presented with with openBVE 'Start new
game' window:
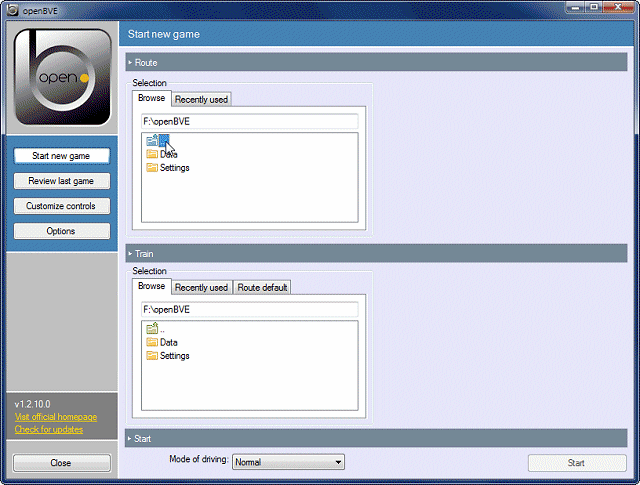
Next,
double click the "Up one level" icon ('..') in the route selection Browse
tab. You'll see the contents of the
parent directory.
If you've followed all the instructions and my recommendations so far, then you'll
see your
"openBVE Content" folder;
double click this,
and then the
'Railway',
'Route',
'Birmingham_Cross-City_South_openBVE',
and
'Day' folders, in turn.
Note: If your 'openBVE' folder and your 'openBVE Content' folder
reside on seperate partitions or hard disks, you'll need to manually type in the
drive letter where your content is stored, in order to change drives; e.g. 'C:\'.
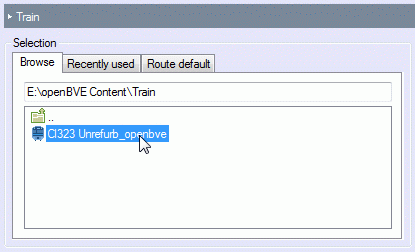
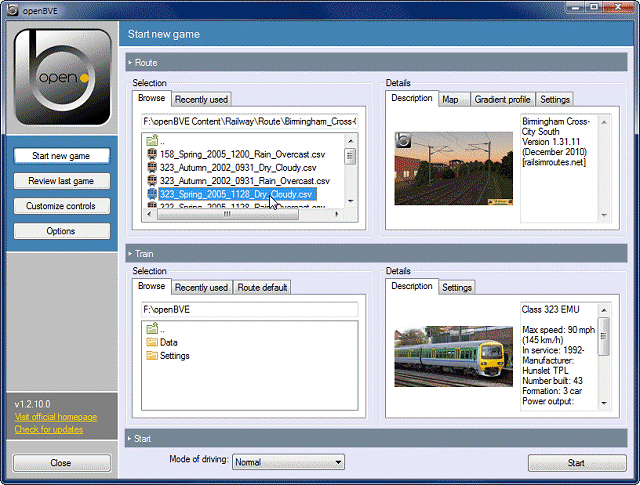
You should be presented with a list of *.csv files; single-click on one of them,
and you should see the following:
If you click on a route which doesn't also have it's default train installed, then
you may see an error in the Train section, stating that a train this route uses,
cannot be found. If this happens, then
in the Train section of the form,
click the
Browse tab if necessary, and repeat the process you went through
to locate a route file before, but this time, select the
'openBVE Content'
folder, then the
'Train' folder instead. You'll see available trains listed
here.
Single click on a train you wish to drive:
Note the
"Mode of driving" drop-down box at the bottom of the screen,
in the Start section. Here, you can select between
Arcade,
Normal or
Expert modes. Each mode offers differing
levels of on-screen assistance and information, and for most users, I'd recommend
the
Normal mode be chosen. Please see the
Driving Modes section of the openBVE website for more information.
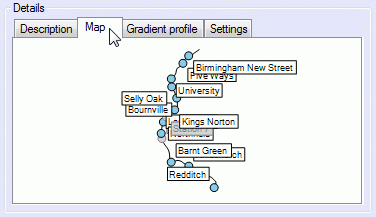
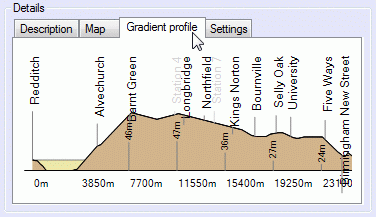
At this stage, you can also optionally review the route you're about to drive, by
clicking the
Map and
Gradient Profile tabs:
You can now choose to start openBVE by clicking the
Start button at the bottom
right of openBVE's window, and the openBVE loading window will appear.
After a few seconds, you should find yourself sitting in the cab of the class 323
EMU, waiting for departure at Redditch... If you don't know what to do now, please
read on.
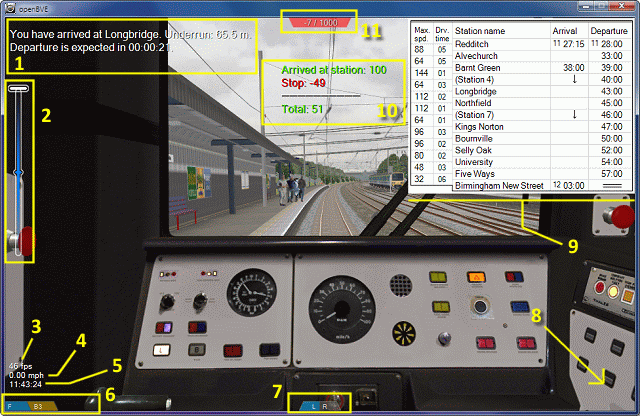
▪ The in-game interface
openBVE includes various in-game elements which relay information to the user, which
are shown in the screenshot below (please note, that the door indicators and stopping
indicator wouldn't normally be visible simultaneously, and the security system indicators which can appear
in the lower right of the window, are only displayed when using trains which don't use a plugin DLL):
Note: Some interface elements are only shown in certain driving
modes, known as
Arcade,
Normal, and
Expert. Please see
this page on the openBVE
website for more information.
The openBVE in-game interface
- Message Area (Arcade and Normal modes only)
- Stopping Indicator (Arcade and Normal modes
only)
- Frames per second [Ctrl+X]
(All modes)
- Speed (kmph/mph) [Ctrl+V --
kmph > mph > off] (Arcade and Normal modes only)
- Clock [Ctrl+C] (All modes)
- Power and Brake Handle Indicators (All
modes)
- Door Indicators [left/right] (All modes)
- Security System Indicators [Ctrl+S
-- On > Off] (All modes, but only visible with non-plugin enabled trains;
see the
openBVE website for more information and commands)
- Timetable [Ctrl+T -- BVE4
style timetable > openBVE Timetable > Hide] (All modes, but the BVE4 style
timetable is only shown with add-ons supporting this feature)
- Messages relating to scoring (Arcade mode
only)
- Current Score (Arcade mode only)
openBVE's
in-game menu can be accessed by pressing the
Escape
key:
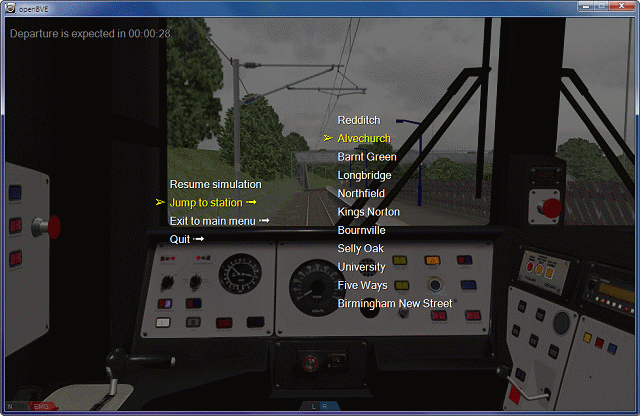
Here, you can jump to other stations en-route, exit the current game and return
to the main menu to load another route and train, or quit openBVE.
To choose
a menu item, use the
'Up' and 'Down Arrow' keys. To
select an option, press the
'Enter' key. To go back up a level
in the menu hierarchy, press the
'Escape' key.
▪ Keyboard Commands (openBVE defaults, and class 323
specific)
For a full list of keyboard commands, please see the Default Keyboard Assignments
page on the openBVE website:
http://odakyufan.zxq.net/use/keyboard.html.
But to get you started, here are the key's you will use most often when using openBVE
with the Class 323 EMU:
Train Controls (including combined
power/brake handle):
 Power Handle:
'1'
Apply Emergency Brakes
'Q'
Apply service brake in steps
'A'
Release brakes in steps OR decrease power
Reverser:
'F'
Push reverser handle away from you (Reverse > Neutral > Forward)
'V'
Pull reverser handle towards you (Forward > Neutral > Reverse)
Door Controls:
'F5'
Manually open/close left doors
'F6'
Manually open/close right doors
Horn Controls:
'Numpad -' [Toggle]
Sound a short high then low tone on the horn (due the way openBVE works, the sound
will repeat until you press 'Numpad Minus' again)
'Numpad +'
Sound a low tone on the horn
'Numpad Enter'
Sound a high tone on the horn
Camera and View Controls
 Camera view selection:
'F1' [Cycle]
Switch to internal cab view (cycle between Interior and Interior [Look Ahead] mode;
with the latter, the view can be focused on the track ahead, i.e. the driver's head
automatically turns in response to travelling through curves, simulating his/her
attention focused further ahead of the train).
'F2'
Switch to external car view (you can either follow the train or enter carriages)
'F3'
Switch to external track view (camera stays in position relative to world)
'F4' [Cycle]
Switch to drive-by views (camera can be moved but remains pointed at the player's
train; cycle between non-zooming and zooming mode)
Points of Interest:
'Numpad 7'
Jump to the next Point of Interest
'Numpad 1'
Jump to the previous Point of Interest
Camera positioning and zooming:
'Numpad 8, 2, 4, 6'
Move the camera Up, Down, Left, Right
'Arrow keys'
Rotate camera Up, Down, Left, Right
'Numpad 9'
Move camera forward
'Numpad 3'
Move camera backward
'Numpad /'
Tilt camera left
'Numpad *'
Tilt camera right
'Numpad 5'
Reset camera position to default
Security System and Miscellaneous Controls
(via plugin DLL):
 Main in-cab system controls (via plugin DLL):
'Insert'
AWS Reset button
'Delete'
Acknowledge Driver Vigilance Device
'Home' [Cycle]
Wipers on / speed up
'End' [Cycle]
Wipers slow down / off
'Page Up'
Enable / Disable TPWS TSS Override
'Page Down'
Isolate AWS, TPWS, and vigilance device
Miscellaneous Controls (via plugin DLL):
'4'
Toggle tail lights on/off
'5' [Cycle]
Set the headlights (day, marker lights only, night, off)
'6'
Signal guard with buzzer (1 buzz per button press)
'Space'
Activate / Deactivate the DRA
Other openBVE Keyboard Assignments:
 In-game Menu Navigation:
'Escape'
AWS Reset button
'Up/Down Arrow'
Acknowledge Driver Vigilance Device
'Enter'
Wipers on / speed up
Miscellaneous openBVE Simulator Commands:
'F10' [Cycle]
Cycle between Debug interface mode, no on-screen information, and normal in-game
information mode
'F11'
Enable or disable backface culling (enables one sided 3D surfaces to be viewed from
both sides, useful for legacy BVE routes designed to be viewed only in a forward
direction)
'F12'
Enable or disable Low CPU mode (reduces CPU usage; handy if you want to multitask
but only have a slow or single core processor)
'Pause'
Pause or resume the game
Other Commands:
'Ctrl+Q'
Quit openBVE (after confirmation)
'Ctrl+A'
Activates or deactivates the AI driver (if you have installed the class 323 3D cab and UkTrainSys cross-platform plugin update, then the AI driver can also fully operate the systems which are simulated by the plugin)
'Ctrl+S'
Activate or deactivate security systems (only visible with non-plugin enabled trains
or for non-Windows users; see the
openBVE website for more information and commands)
'Ctrl+X'
Show or hide the framerate
'Ctrl+C'
Show or hide the in-game clock
'Ctrl+V' [Cycle]
Show or hide the current speed or velocity (mph > km/h > hide)
'Ctrl+R'
Disable or enable in-cab camera restriction (when disabled, allows you to pan the
camera beyond the boundaries of the 2D cab panel or image)
'Ctrl+T'
Show the timetable (BVE4 style timetable > openBVE Timetable > Hide)
'Ctrl+Up/Dn Arrow'
Scroll up or down the openBVE style timetable
'Ctrl+F'
Switch between windowed and fullscreen mode
'Ctrl+J'
Time Acceleration (x5 / Normal)
'Ctrl+M'
Mute/Enable Sound
'Ctrl+B'
Show or hide the braking system debug output
'Ctrl+N'
Show or hide vertex normals (advanced users only)
'Ctrl+W'
Show or hide wireframe 3D models
▪ openBVE options and recommended settings
There are various options you can set, to alter openBVE's
rendering quality,
sound capabilities,
control configuration, and
simulation features. Clicking the
Options button on the left,
brings up the following view:
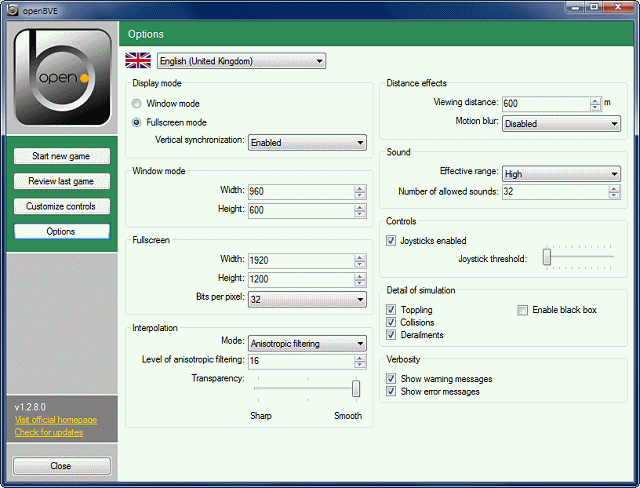
Most of the settings should be self-explanatory, but here are a few tips:
In openBVE, you can
set any arbitrary display resolution, which
can be handy, especially in Windowed mode. However, for fullscreen mode, and if
you use a TFT monitor in particular, you'll probably just want openBVE to run at
the native resolution of your monitor. Some common display resolutions in use today
are as follows (please check the capabilities of your monitor to determine which
are suitable for your hardware though):
Common display resolutions and screen
sizes
(Width x Height)
16:10 ratios:
1280 x 800 [WXGA] (14-15" TFT widescreen monitors)
1440 x 900 [WXGA+] (17-19" TFT widescreen monitors)
1680 x 1050 [WSXGA+] (22" TFT widescreen monitors)
1920 x 1200 [WUXGA] (24" TFT widescreen monitors)
2560 x 1600 [WQXGA] (30" TFT widescreen monitors)
16:9 ratios:
1280 x 720 [HD 720] (various TFT widescreen monitors and older LCD televisions)
1366 x 768 [WXGA] (various TFT widescreen monitors and flat-panel televisions)
1920 x 1080 [HD 1080] (various TFT widescreen monitors and flat-panel televisions)
5:4 ratios:
1280 x 1024 [SXGA] (typically 17-19" TFT monitors)
4:3 ratios:
800 x 600 [SVGA] (typically old CRTs)
1024 x 768 [XGA] (15" TFT monitors / 17" CRT monitors)
1600 x 1200 [UXGA] (some TFT monitors and better CRTs)
openBVE features
various options for image quality. Personally,
I recommend the following:
Recommended image quality options
Best image quality (faster computers and graphics
cards):
openBVE options:
Interpolation Mode: Anisotropic filtering
Level of anisotropic filtering: 16 (or
highest available)
Transparency: Smooth (slider full right)
Via graphics card driver control panel (help with setting these options via your
graphics card's driver can be found on the
next page):
Antialiasing: 16x (or highest available)
Anisotropic filtering: 16x (or highest
available)
Good quality (slower computers and graphics
cards):
openBVE options:
Interpolation Mode: Bilinear
Level of anisotropic filtering: not applicable
Transaprency: not applicable
Via graphics card driver control panel:
Antialiasing: 8x (or highest available)
Anisotropic filtering: 16x (or highest available)
If your computer or graphics card is too slow for full Smooth transparency to be used,
then Bilinear interpolation is good for routes which rely heavily on transparent
textures, such as routes with texture-based catenary, fencing, or lots of trees
and vegetation. However, you may find the graphical quality to be a little too "noisy"
or "grainy", which will be particularly visible on the track and ballast. If this
bothers you, then you can select one of the mipmapping options instead. The Trilinear
and Anisotropic Filtering options in particular, will produce some very nicely smoothed
textures, however you may find that catenary, chain-link fences, and other such
transparency-based objects, don't become visible until they're quite close to the
camera. You'll just need to decide whether good looking track and scenery textures,
or better looking transparent textures, are more important to you. Setting the
Transparency option to Smooth (moving the slider all the way to the right)
resolves this issue.
The Motion blur option is simply good fun, so give it a try and enjoy. :)
I personally recommend that the
Viewing Distance be set to
at least
600 metres. Some routes, like my own, may be designed with this viewing distance in mind. If
you have a very slow computer, then reducing the viewing distance may yield higher framerates,
but in many cases you can probably increase the viewing distance. As ever, just experiment. :)
I set the
Sound Effective Range option to High, and the
Number
of allowed sounds to 32. If you find that some sounds aren't being
played while in-game, you might want to lower these settings and see if an improvement
is noticed.

If you experience low framerates or stuttering:
Firstly, ensure that you're
not still using any default
graphics drivers shipped with Windows; see the
previous
page for help with obtaining high performance graphics drivers from your
graphics card manufacturer's website.
Next, try
lowering your anti-aliasing and anisotropic filtering
settings via your graphics card drivers, select
any interpolation mode other
than Anisotropic Filtering in openBVE's settings, disable openBVE's
Motion Blur feature, set the
Transparency option to Sharp,
and try
lowering the drawing distance as well. Then change each
setting, one at a time, to see which has the most negative effect on framerates
and fluidity, and try to find a balance between performance and visual quality.
Alternatively, if you're using
Windows XP, try
lowering your
Windows audio hardware acceleration settings. Go to
Start > Control
Panel > Sounds and Audio Devices. Then in the
Speaker Settings
section of the
Volume tab, click the
Advanced
button, click the
Performance tab in the resulting applet window,
and reduce the Hardware acceleration slider to a
lower setting
such as "Basic acceleration". Click Apply, and try openBVE again. Try other slider
settings too, and see if any work better for you.
Lastly, if you have a stuttering or pausing problem which you can't resolve, as a last resort, please see
this page on the official openBVE website,
and change the
disableDisplayLists = setting;
this might help. Setting it to
true may yield more consistent, but possibly significantly lower,
framerates.
▪ Driving the Cross-City South
Now that openBVE, the Cross-City South and the class 323 are installed, and you're
more familiar with openBVE's interface and options, you might want to learn a little
about how to drive the route; for example, interpreting lineside signs correctly,
responding to safety system warnings, or recreating a realistic driving experience.
Please read the
Class 323 and Cross-City South Tutorial for openBVE if
this is the case, or you can continue to the next page and read
about setting anti-aliasing and anisotropic filtering via your graphics card's drivers.
Content last updated: 12th May 2012